29 Cute & Easy Spring Door Decorations for School: 29 Inspiring Classroom Ideas
Introduction to 29 Cute & Easy Spring Door Decorations for School: 29 Inspiring Classroom Ideas
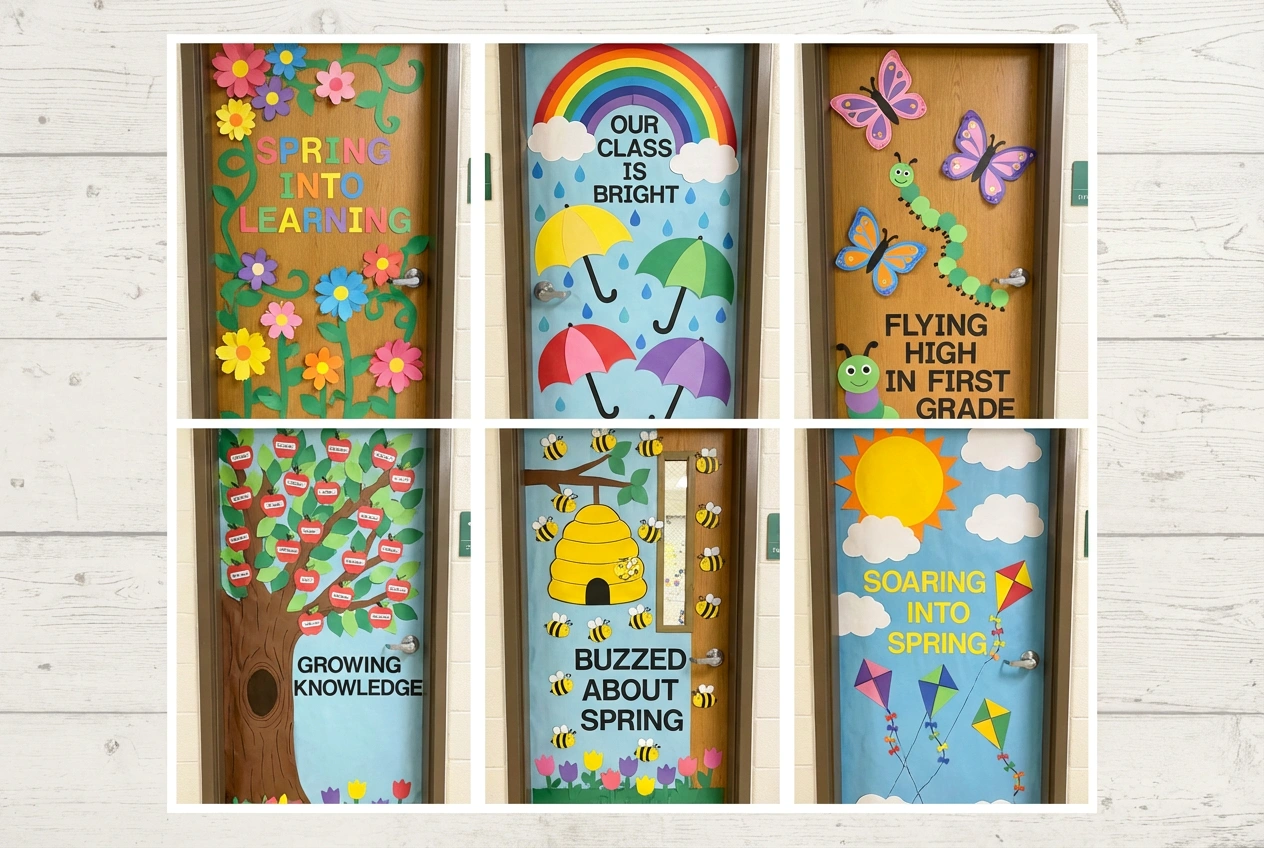
As the frost of winter melts away and the first buds begin to peek through, there’s an undeniable urge to refresh and renew our surroundings. This is especially true in educational spaces, where the environment plays a crucial role in setting the tone for learning and creativity. Transforming a classroom door with vibrant, thematic decor is more than just a craft project; it’s a powerful way to welcome students into a world of imagination and seasonal joy. Engaging spring door decorations for school can instantly uplift spirits, foster a sense of community, and create an inviting portal that says, “Something wonderful is happening here.”
This collection of 29 inspiring ideas is designed to be your ultimate resource. Whether you’re a teacher looking for a quick weekend project, a parent volunteer eager to help, or a student council member planning a school-wide beautification, these concepts blend aesthetic appeal with effortless execution. From blooming 3D flowers and cheerful rainbows to curious caterpillars and buzzing bee hives, each idea is crafted to spark inspiration. Ultimately, a beautifully decorated classroom entrance does more than just look pretty; it builds anticipation, celebrates growth, and makes the simple act of entering the room a delightful experience. Let’s explore how these cute and easy projects can transform your school’s hallways into a gallery of springtime cheer.
Why Choose Spring Door Decorations for School for Your Space
You might wonder why dedicating time to decorating a classroom door holds such significance. The answer lies in the multifaceted impact it has on the educational environment. Firstly, visual appeal directly influences mood and engagement. A dull, blank door is simply a barrier, whereas a creatively adorned entrance becomes a landmark—a visual cue that signals a shift from the bustling hallway to a dedicated space for exploration and discovery. This is particularly effective for younger students who thrive on visual stimulation and thematic learning.
Furthermore, these decorations serve as a powerful tool for building classroom identity and unity. A door themed around “Our Garden of Growth” or “Flying into Spring” creates a shared narrative. Students see their names on butterflies or their handprints as flower petals, fostering a profound sense of belonging and ownership. This communal art project strengthens the classroom community, making everyone feel like an integral part of the whole. Additionally, seasonal door decor is an excellent way to integrate curriculum themes, from science lessons on plant life cycles to literacy projects involving spring poetry.
Finally, the process itself is invaluable. Creating these decorations often involves collaboration, problem-solving, and fine motor skill development. It’s a hands-on project that yields immediate, colorful results, providing a tremendous sense of accomplishment for everyone involved. In essence, choosing to implement these spring classroom door ideas is an investment in the emotional and social fabric of the learning space, proving that a little creativity can open the door to a much brighter, more connected classroom atmosphere.
Key Elements & Design Components
Essential Decor Items for Spring Classroom Door Designs
To bring any of these 29 ideas to life, you’ll need a core toolkit of supplies. Fortunately, most items are affordable and readily available at craft stores, making these projects accessible for any budget.
- Base Materials: Start with a solid foundation. Colored butcher paper or rolls of bulletin board paper are perfect for covering the door itself, creating a clean canvas. Felt sheets in vibrant spring hues (greens, pinks, yellows, blues) are excellent for creating durable shapes like leaves, flowers, and animals.
- Structural Elements: For adding delightful dimension, collect supplies like tissue paper (for fluffy clouds or pom-pom flowers), crepe paper streamers (for rain or grass), and cotton balls (for sheep or cloud texture). Pool noodles, cut in half, make perfect 3D rainbows or caterpillar bodies.
- Adhesives & Tools: A reliable adhesive is key. Painter’s tape is ideal for securing paper to the door without damage. Double-sided tape, glue dots, and a hot glue gun (for adult use) will handle everything from lightweight paper to more substantial craft foam. Don’t forget a good pair of scissors, a pencil for sketching, and a ruler or measuring tape.
- Thematic Accents: This is where personality shines! Googly eyes bring any creature to life. Sparkly sequins or glitter paper can mimic morning dew or add magic to wings. Butcher paper cut-outs of student photos, handprints, or written work personalize the display, transforming it from a decoration into a classroom masterpiece.
Style Variations & Budget-Friendly Alternatives
The beauty of these spring door decoration ideas is their incredible adaptability. Whether you have five minutes or a full planning period, there’s a version for you.
- For the Time-Crunched: Opt for large, simple shapes. A single, giant sunflower with a brown paper center filled with student names is stunning and fast. A “Hello Spring” banner with paper butterflies fluttering around it is another quick win. Use pre-cut letters or have students color pre-drawn elements to save time.
- For the Budget-Conscious: Embrace upcycling! Scrapbook paper scraps become beautiful petals. Cardboard egg cartons transform into adorable bees or flowers. Old magazines can be cut into collages for a mosaic butterfly effect. Student artwork is always the most precious and cost-effective material of all.
- For Different Age Groups: For younger grades, focus on bold, bright colors and friendly animals (ladybugs, bumblebees, chicks). Incorporate more student-created elements, like finger-painted blossoms. For older students, consider more sophisticated themes like a “Spring into Reading” door with book covers as flowers or a poetic “April Showers Bring May Flowers” design with student-written poems as raindrops.
How to Achieve the Look: Step-by-Step Styling Guide
Follow this simple, adaptable process to create a stunning spring display on your classroom door.
Step 1: Theme Selection and Planning
First, choose a theme that resonates with your class. Browse the 29 ideas and select one that matches your available time, resources, and student interests. For instance, “A Hive of Busy Bees” is perfect for a hard-working class. Next, sketch a rough layout on paper. Decide on your color palette—will it be pastel and soft, or bright and bold? Finally, make a comprehensive supply list based on your sketch. This planning stage prevents mid-project shortages and ensures a smooth process.
Step 2: Preparing the Door Canvas
Begin by cleaning the door surface to ensure good adhesion. Then, apply your background. If using paper, measure and cut butcher paper to size, securing it at the top with painter’s tape and smoothing it down. A solid blue makes a perfect spring sky, green creates lush grass, and light yellow suggests sunshine. This step instantly transforms the space and sets the stage for your scene.
Step 3: Creating and Assembling Main Elements
Now, craft the central characters of your display. If making a giant rainbow, cut arch shapes from colored paper or foam. For a flower garden, cut out various sized petals and leaves. Involve your students here! They can trace, color, or cut out simpler shapes. Construct these larger pieces on a table before moving them to the door. This is also the stage to add delightful details like facial features on animals or veins on leaves.
Step 4: Application and Layout
Before any permanent sticking, do a “dry fit.” Place all your major elements on the door background using small pieces of removable tape. Step back and assess the balance and composition. Once satisfied, begin adhering everything permanently, working from the background forward (e.g., grass first, then flowers, then butterflies on top). Use stronger adhesives like glue dots or hot glue for heavier 3D items.
Step 5: Personalization and Final Touches
This is the most important step for creating emotional impact. Personalize the decor. Add student names to flower centers, bee wings, or raindrops. Incorporate student photos or their handwritten goals on kite tails. Finally, add those magical finishing touches: a welcoming message like “Welcome to Our Patch” on a garden sign, some glitter on dragonfly wings, or curled ribbon tendrils on vines. Stand back and admire your collaborative, cheerful spring door masterpiece.
Elevating the Look: Advanced Styling Tips
To take your classroom door decor from great to extraordinary, consider these pro tips. Firstly, think in layers and texture. Instead of flat paper flowers, create some with curled petals using a pencil. Mix materials—combine smooth paper leaves with fuzzy felt ones or crinkly tissue paper blooms. This depth makes the display more dynamic and engaging from all angles down the hallway.
Secondly, integrate interactive elements. For example, create a door where a paper net “catches” butterflies labeled with student names. Or, make a tree where new “leaves” (notes about acts of kindness) are added throughout the season. This keeps the decoration fresh and actively involved in classroom life. Furthermore, don’t neglect the door frame and surrounding wall. Extend your scene slightly onto the frame with climbing vines or drifting clouds to create an immersive, framed-portal effect.
Finally, lighting can play a subtle role. If there’s a ceiling light above the door, consider dangling a few clear fishing line threads with tiny paper raindrops or butterflies from it, so they catch the light. The play of shadow and movement adds an unexpected and enchanting layer to your spring door display, making it a true standout in the school.
Maintenance & Care: Keeping Your Space Fresh
Spring door decorations typically stay up for a month or two, so a little maintenance ensures they continue to look their best. Firstly, for paper-based decor, a quick once-over with a dry, soft cloth or a duster can remove hallway dust. If any elements become loose, secure them promptly with fresh tape or glue to prevent further peeling.
If you’ve used laminated pieces or more durable materials like felt, you can carefully remove them at the end of the season and store them flat in a large portfolio or between sheets of cardboard. Label the storage container clearly. Many elements, like generic flowers or butterflies, can be reused or reconfigured for future seasonal door ideas, saving you time and resources next year. For a simple refresh halfway through the season, you can add new student work or swap out a central message to keep the display feeling current and engaging.
FAQs: Frequently Asked Questions About Spring Door Decorations for School
Q1: How can I decorate my classroom door without damaging it?
This is a top concern, especially for rented spaces. Always use painter’s tape, as it is designed to remove cleanly. Avoid duct tape, packing tape, or anything with a strong adhesive. For hanging heavier items, use adhesive hooks rated for temporary use. Command Strips are also an excellent, damage-free option for securing lightweight 3D elements.
Q2: What are some very quick and easy spring door ideas for a last-minute project?
Opt for a minimalist but impactful design. A simple “Hello, Sunshine!” message with large, bright yellow paper sun rays emanating from the doorknob is fast and cheerful. Alternatively, create a “Showers of Kindness” door with blue paper raindrops, each containing a student’s name, falling from a single cloud. Both use minimal cuts and can be assembled in under an hour.
Q3: How do I involve my students in creating the door decor?
Student involvement is key! They can color pre-drawn elements, cut out simple shapes, trace templates, or glue pieces together. Incorporate their work directly: use their painted handprints as butterfly wings, their self-portraits as flowers in a garden, or their spring-themed acrostic poems as part of the display. This builds ownership and pride.
Q4: Are there inclusive themes that work for all spring holidays and cultures?
Absolutely! Focus on universal symbols of the season. Themes like “Growing Together,” “Blossoming with Knowledge,” “Our Garden of Friends,” or “Spring into Learning” celebrate growth and renewal without aligning with any specific holiday. Nature-based designs—rainbows, gardens, insects, sunshine—are naturally inclusive and joyful for everyone.
Q5: How can I adapt these ideas for a virtual or hybrid classroom setting?
The spirit of spring door decorations can translate digitally! Create a collaborative virtual “door” using a tool like Google Slides or Jamboard. Design a background and have each student add a digital sticker, drawing, or photo of their own spring creation. You can then use this collective artwork as your virtual classroom background or share it in a newsletter to foster the same sense of shared community.